1 Steam Cars : Phorum

Attachments: P7050002.JPG (248.9KB)
Attachments: DSCF2298.JPG (139.2KB) DSCF2300.JPG (117.6KB)
Attachments: Start front hub.JPG (151.5KB) drill spoke holes.JPG (218.6KB) Finished front hub .JPG (130.6KB) rear drum.JPG (185.5KB)
Attachments: P6040003.JPG (173.5KB) finished rear hub.JPG (155.3KB) P9210005.JPG (208.7KB) P9210004.JPG (236.2KB)
Attachments: P9210006.JPG (178.9KB) P9210003.JPG (202.5KB)
Attachments: P9220007.JPG (191.7KB) P9270003.JPG (291KB) P9270006.JPG (291.5KB)
Attachments: Adjustable ball check caps.jpg (119.8KB)
Attachments: PB040007.JPG (147.1KB) Blank for four.JPG (146.5KB) finished four blocks.JPG (179.2KB)
Attachments: 1914 Stanley 606. last ride for 2012.jpg (238.6KB)
Attachments: Stanley #7644 dummy top bows.jpg (264.7KB)
Attachments: DSCF2351.JPG (91.9KB) DSCF2352.JPG (102.2KB) DSCF2353.JPG (107.6KB)
Attachments: 20 HP Crossheads.JPG (175.3KB)
Attachments: Burner 30 hp . jpeg.JPG (112.4KB)
Attachments: Air tubes.JPG (159.8KB) Burner pan.JPG (149.5KB) Deflection Plate.JPG (110.6KB) Deflection Plate Drg. jpg.jpg (50.9KB)
Attachments: Burner 30 hp.JPG (116.7KB)
Attachments: 30 hp Baker Burner grate in place.jpg (235.3KB) 30 hp Baker grate baffle.jpg (258.4KB) 30 Hp Baker grate gets moldable Fiber Frax.jpg (152.7KB) 30 hp Baker Plenum with mixing tubes.jpg (285.6KB)
Attachments: crosshead castings.JPG (214KB) Crosshead pattern..jpg (148.6KB) P6030033.JPG (191.1KB)
Attachments: 30 hp Baker Burner 6.4.13 002.jpg (72.2KB) 30 hp Baker Burner 6.4.13 004.jpg (99.5KB)
Attachments: Maxwell Pilot lights 002.jpg (47.8KB)
Attachments: P7020034s.jpg (209.8KB)
Attachments: piston rod and crosshead guides -s.jpg (103.2KB)
Attachments: 20 HP pistons.jpg (217KB) 20 HP Cylinder heads.jpg (229.9KB) 20HP cylinder heads-s.jpg (249.4KB) pistons.- s.jpg (166KB)
Attachments: Box frame engines.JPG (236.2KB) finished brazed-a.jpg (187.3KB) 1909 Stanley.jpg (182.4KB)
Attachments: 20 HP cylinder covers.jpg (168KB)
Attachments: DSCF0571e.jpg (79.3KB) DSCF0572e.jpg (149.1KB)
Attachments: DSCF0581e.jpg (111.7KB) DSCF0584e.jpg (123.7KB)
General Steam Car topics
Re: What are your work shop projects being worked on?
Posted by: Rolly (IP Logged)
Date: July 05, 2012 05:50PM
Rolling tubs, laying on your back under a car suck at any age but I think Im getting two old for it. Ill do my exercise at the jim.
Ill stick to my own work, no more jobs.
Rolly
Ill stick to my own work, no more jobs.
Rolly
Attachments: P7050002.JPG (248.9KB)
Re: What are your work shop projects being worked on?
Posted by: Jeff Brown (IP Logged)
Date: August 27, 2012 12:12AM
Not much seems to happening lately but I've been battling on. Today I finished carving the throttle lever out of a chunk of brass, except for some final polishing, which means the steering column is about as finished as it is going to be until it goes in the car.
Pics attached
Jeff
Pics attached
Jeff
Attachments: DSCF2298.JPG (139.2KB) DSCF2300.JPG (117.6KB)
Re: What are your work shop projects being worked on?
Posted by: Rolly (IP Logged)
Date: August 30, 2012 01:30PM
Jeff
I was wondering what youve been up to, nice work as always.
Rolly
I was wondering what youve been up to, nice work as always.
Rolly
Re: What are your work shop projects being worked on?
Posted by: Rolly (IP Logged)
Date: September 21, 2012 06:26PM
New Project, Wire wheels
Reading the early Stanley catalogs I noticed wire wheels were optional for about $90 a set. This option was dropped from the catalog in 1908. but they must have been available after that as wire wheel showed up on 1915-16-and later, from the photos shown in Kit Fosters book.
While in North Carolina visiting my son, I stopped in at the NASCAR museum to see the original wheel hubs and other parts from the Stanley Rocket. I realized all it would take to make wire wheels is to make the hub to fit your axles, as rims are available. I talked to John Mclaren he makes the clincher rims 30 X 3 that fit my EX and also wire wheels for the Model T. John gave me the hole size for the spoke, I decided to design and build some hubs to fit my Stanley EX. I made my hubs and ordered the rims punched for the spokes from John and since I have never spoked a wheel I sent them off to Buchanan Spoke and Rim in California to make the spokes and spoke them.
See attached photos.
Rolly
Attachments: Start front hub.JPG (151.5KB) drill spoke holes.JPG (218.6KB) Finished front hub .JPG (130.6KB) rear drum.JPG (185.5KB)
Re: What are your work shop projects being worked on?
Posted by: SSsssteamer (IP Logged)
Date: September 21, 2012 07:07PM
Rolly, Great looking hubs. As usual, you do excellent work. Your photos make it look easy. But we really know it is a lot of work.
Re: What are your work shop projects being worked on?
Posted by: Rolly (IP Logged)
Date: September 21, 2012 07:30PM
Pat this has been one of my most frustrating projects. I wont go into that now.
Hear are some more photos. Now I need to get the rubber on.
Rolly
Rolly
Edited 1 time(s). Last edit at 09/21/2012 07:32PM by Rolly.
Hear are some more photos. Now I need to get the rubber on.
Rolly
Rolly
Edited 1 time(s). Last edit at 09/21/2012 07:32PM by Rolly.
Attachments: P6040003.JPG (173.5KB) finished rear hub.JPG (155.3KB) P9210005.JPG (208.7KB) P9210004.JPG (236.2KB)
Re: What are your work shop projects being worked on?
Posted by: Rolly (IP Logged)
Date: September 21, 2012 08:14PM
Hear are a few more photos. I went for the modern look of having all the spokes on one side of the flange and the head recessed.
This requires every other spoke to have a longer bend where they cross, need to plan ahead. These are forty spoke 7-8 gauge two spoke cross pattern.
Rolly
This requires every other spoke to have a longer bend where they cross, need to plan ahead. These are forty spoke 7-8 gauge two spoke cross pattern.
Rolly
Attachments: P9210006.JPG (178.9KB) P9210003.JPG (202.5KB)
Re: What are your work shop projects being worked on?
Posted by: SSsssteamer (IP Logged)
Date: September 21, 2012 08:34PM
Dear Rolly, When you start getting some miles on your new wire wheels, as the spokes become seated,they will soon loosen up on you. Next, if you don't already know how to, you will learn how to tune your spokes for proper tension and trueness. I tune my motorcycle spokes so that they all have the same tone when the spokes are struck. All the spokes that have the same tone, also have the same tension. SSsssteamer
Re: What are your work shop projects being worked on?
Posted by: Rolly (IP Logged)
Date: September 27, 2012 05:43PM
I bought white tires, their 20-year new old stock. When I went to install them on the rims I found them to be 1-1/2 inches two small in diameter.
I had to build a stretcher and a heat box and finely got them mounted.
Hear is the new look.
Rolly
I had to build a stretcher and a heat box and finely got them mounted.
Hear is the new look.
Rolly
Attachments: P9220007.JPG (191.7KB) P9270003.JPG (291KB) P9270006.JPG (291.5KB)
Re: What are your work shop projects being worked on?
Posted by: SSsssteamer (IP Logged)
Date: September 28, 2012 01:38AM
Dear Rolly, The new wheels and tires look beautiful! Is there much of a weight saving comparing the old wood wheels with the new wire wheels? About how much of a weight difference is there between them?
Re: What are your work shop projects being worked on?
Posted by: Rolly (IP Logged)
Date: September 28, 2012 03:03PM
Dear Pat much to my surprise they weigh the same. 37Lb front 47Lb back.
Rolly
Rolly
Re: What are your work shop projects being worked on?
Posted by: SSsssteamer (IP Logged)
Date: October 20, 2012 04:19AM
After over 25 years of steaming our non condensing Stanleys, I had to pull maintenance on the Power Water Pump's adjustable ball check caps. A couple of them didn't have good enough threads left on them, one car didn't have any adjustable ball check caps, and I also didn't have any spares adjustable ball check caps on the shelf. I spent a couple of days turning out and updating what you see in the attached photo. They sure do quiet the pump ball check noise down to an acceptable level. The measurements for these can be found in a recent issue of "The Steam Automobile Bulletin".
Edited 1 time(s). Last edit at 10/20/2012 04:22AM by SSsssteamer.
Edited 1 time(s). Last edit at 10/20/2012 04:22AM by SSsssteamer.
Attachments: Adjustable ball check caps.jpg (119.8KB)
Re: What are your work shop projects being worked on?
Posted by: SSsssteamer (IP Logged)
Date: November 01, 2012 12:46PM
I have been busy installing a new boiler into our 1914 Stanley 606. It is ready to steam up now. If it would stop raining for just a few hours, I will take it our and see how it performs. The old boiler was 20 years old, had 30,000 miles on it and it suffered from mud burns. It had been scorched about 15 years ago pretty good and that didn't help either. My rapid firing up with my Baker burner didn't help either. From cold, I have fired up to driving away in 3 1/2 minutes. The last time that I fired up that hard was at Bakersfield this last April and from there on, the boiler became a leaker. I tried swaging the boiler about 4 different times but the boiler didn't seem to have anything left to pull it tight with.
Re: What are your work shop projects being worked on?
Posted by: Rolly (IP Logged)
Date: November 07, 2012 05:13PM
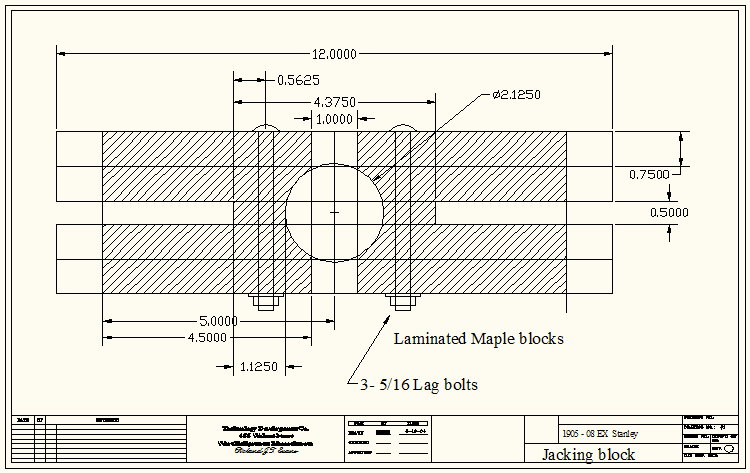
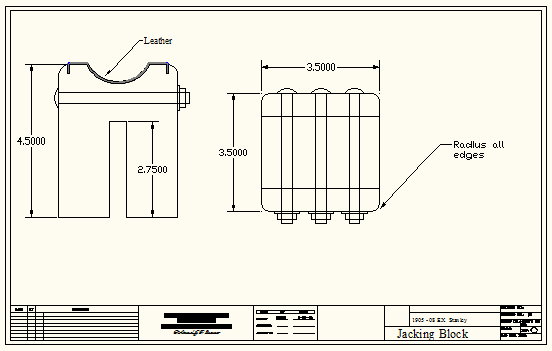
Jacking blocks
I decided I needed a few more jacking blocks. I made a few several years ago but gave some away; you need at least two if you want to put a stand under one. I like keeping one wheel off the floor and every time Im in the garage I give the engine a turn.
I glue them up laminated from Maple boards. One of my drawings shows lag bolts, there carriage bolts.
Rolly
[www.stanleysteamers.com]
[www.stanleysteamers.com]
Attachments: PB040007.JPG (147.1KB) Blank for four.JPG (146.5KB) finished four blocks.JPG (179.2KB)
Re: What are your work shop projects being worked on?
Posted by: SSsssteamer (IP Logged)
Date: November 07, 2012 09:17PM
Dear Rolly, Pretty handy jacking blocks that you have made up. Sure beats doing damage to the paint and bending the axle truss rods. I had our 1914 Stanley roadster on the road with its new boiler. Works good and no leaks yet.
Re: What are your work shop projects being worked on?
Posted by: Rolly (IP Logged)
Date: November 07, 2012 11:58PM
Dear Pat
Where did you get the boiler? Are the tubes swaged or rolled in.
Rolly
Where did you get the boiler? Are the tubes swaged or rolled in.
Rolly
Re: What are your work shop projects being worked on?
Posted by: SSsssteamer (IP Logged)
Date: November 08, 2012 12:24AM
Rolly, I purchased a couple 20 HP boilers from Howard Johnson and I took delivery of them at the Iowa Steam Car tour. (no freight charges) :) The boilers were built by Howard and his family. Both were hand swaged. Well finished in all respects. The extra boiler is going into my model R. I didn't like the new boiler that was in my R because, for me, it didn't have enough fire tubes in its tube sheet pattern.
Re: What are your work shop projects being worked on?
Posted by: SSsssteamer (IP Logged)
Date: December 28, 2012 10:30PM
We had Harold Musolf Jr., his son Greg and his grandsons here today. Since this year is about all used up (December 28, 2012), we decided to go steaming. With its new boiler, we took out our 1914 Stanley roadster for several trips around the neighborhood. The snow was very low on the hills, but the freezing temperatures didn't seem to slow down the Stanley at all. Worst part about being out driving this time of year is that I had to wash all of the mud and leaves from the tires and out from inside the fenders. The condinsate left in the air behind the Stanley was something of a sight to see. And in the freezing air, the big white cloud hung around for quite a while. We had FUN.....
Attachments: 1914 Stanley 606. last ride for 2012.jpg (238.6KB)
Re: What are your work shop projects being worked on?
Posted by: Peter Turvey (IP Logged)
Date: January 07, 2013 03:55PM
Over Xmas I fitted the dummy top bows made up after measuring the Carl Amsley restored top on car #7717. Today I rolled #7644 out of the garage and put some battens over the dummy bows to check the angles of the top. Looks like the dumensions are ok & we are nearly ready to order the bows.
As the garage entrance is up a slope I've also put a winch in so I can get the car back when not in steam.
Peter
As the garage entrance is up a slope I've also put a winch in so I can get the car back when not in steam.
Peter
Attachments: Stanley #7644 dummy top bows.jpg (264.7KB)
Re: What are your work shop projects being worked on?
Posted by: SSsssteamer (IP Logged)
Date: January 07, 2013 07:08PM
A very beautiful model 607. From the photo, it is hard to tell how your top will look when finished. I am sure that if it is like the rest that you have restored, it will be looking perfect.
Re: What are your work shop projects being worked on?
Posted by: Kelly (IP Logged)
Date: January 08, 2013 01:08PM
Just don't forget to swap out those blue top straps. :-)
Re: What are your work shop projects being worked on?
Posted by: Peter Turvey (IP Logged)
Date: January 08, 2013 10:40PM
Thanks for the compliment SSssteamer, I've been busy with paintbox and filled in the top outlines on the photo to get a better impression of how the top will look, finished results at [flic.kr]
Re: What are your work shop projects being worked on?
Posted by: SSsssteamer (IP Logged)
Date: January 09, 2013 02:15AM
By golly, I think that you have it. Another test of the size of the top bows is if they will all nest when down into your top saddles. The 1914 has a unique top saddle that if a top bow that is too wide, it will not stack properly. The outside width of all four bows has to end up being the same width for each top bow.
Re: What are your work shop projects being worked on?
Posted by: SSsssteamer (IP Logged)
Date: January 24, 2013 06:14AM
I am in the middle of rebuilding a couple of Baker burners. Our Mt. Wagon kept on lighting back in the venturi. I am sure that the fire came around the burner plate inside somehow. It sure wasn't igniting from around the outside. I will let you know what I find out. Our model R is getting a new burner pan. The old one had too many holes in it to work with. It was an old used burner when I got it. Winter is the time to work on the steam cars. :)
Re: What are your work shop projects being worked on?
Posted by: Peter Turvey (IP Logged)
Date: February 03, 2013 09:16PM
I am completing the hood and smoke hood insulation on my Model 607 - query - what is the best material to use - diplag on its own, or a layer of (1/8"?) fiberfrax finished off with diplag?
Assuming I of course can get same in the UK, or shipped over at reasonable price!
Peter Turvey
Marlborough UK
Assuming I of course can get same in the UK, or shipped over at reasonable price!
Peter Turvey
Marlborough UK
Re: What are your work shop projects being worked on?
Posted by: Rolly (IP Logged)
Date: February 06, 2013 03:27PM
I dont know what Diplag material is. Fiberfrax is an insulation, I used three layers of 1/8 Fiberfrax and a finishing cloth on my EX hood. The finishing cloth comes in very fine to course grades (I used a fine weave) and is pre socked with a water activated adhesive. I then finished the job with a coat of flat white latex paint.
On the EX there is very little space between the smoke hood and the inside of the hood.
I used contact cement to apply the Fiberfrax, but first I cut a five inch strip of finishing cloth around the bottom edge of the hood hanging out a couple of inches, after the fiberfrax was installed this was wrapped up to form a finish edge to the bottom edge of the job. Then the finishing cloth was applied to the complete inside of the hood and the flat white latex.
Rolly
Re: What are your work shop projects being worked on?
Posted by: Kelly (IP Logged)
Date: February 07, 2013 02:56AM
I'm glad to get the term "finishing cloth", I hadn't heard that one before. Another term is "rewettable fabric", see the following:
[www.newtex.com]
[www.gltproducts.com]
[www.amerisafe.net]
[www.newtex.com]
[www.gltproducts.com]
[www.amerisafe.net]
Re: What are your work shop projects being worked on?
Posted by: Rolly (IP Logged)
Date: February 07, 2013 03:33PM
Dear Kelly
I used the term (finishing cloth) as there are more than one manufacture. I have been buying my refractory (insulating material and coverings) from Refractory supply houses in the Boston area for years. There is one in Waltham Mass and another large one in Newburyport Mass, and a few others.
I buy it by the roll and case; sometimes if I go in person I can finagle a broken case or smaller quantity.
Also Fiberfrax has dominated the insulation material as a brand for steam cars but there are several other manufactures. I have bought hard board 2X4 sheets from 1 thick to 2 thick for water tube boilers as well as bat of 2 to 4 inches thick rolls by the foot.
The finishing cloth is not an insulating material but is made to stand up to the heat of boilers and steam piping and paints fairly well. Go into any power plant and you will see it painted many colors as each system has its own color.
Rolly
Re: What are your work shop projects being worked on?
Posted by: Jeff Brown (IP Logged)
Date: February 17, 2013 01:24AM
Finally finished the main body for my R today with the last lot of sealer and sanding. Some pics attached.
It's all sealed with epoxy so it doesn't do things in the Arizona summer heat. Now I just have the seats to build so tomorrow it is time to start on the former to mold them on.
Jeff
It's all sealed with epoxy so it doesn't do things in the Arizona summer heat. Now I just have the seats to build so tomorrow it is time to start on the former to mold them on.
Jeff
Attachments: DSCF2351.JPG (91.9KB) DSCF2352.JPG (102.2KB) DSCF2353.JPG (107.6KB)
Re: What are your work shop projects being worked on?
Posted by: SSsssteamer (IP Logged)
Date: April 27, 2013 06:26AM
On April 14th, 2013, we took a 7 day driving tour in Southern California, steaming some days up to 138 miles in length. On the 4 day part of progressive touring, we went up into the Sequoia National Park and we traveled with a group of ten pre 16 gas cars to the a Park lodge where at the 8,000 foot elevation, we spent the night. Our car froze up and was damaged in 20 degree F. and 20 mph winds. Lately, I have been working on rebuilding my pump pit on our 1914 Stanley Roadster. After our freeze up there, I moved the Stanley without first checking the water pumps for being frozen solid. Leaving a day ahead of the others. I broke the pump drive rocker arm in two and I bent the "H" pump drive a bit to a diamond shape from the freeze up. Even with that damage, traveling only by ourselves and no back up, we successfully drove the roadster 36 miles down the mountain road without the pump drive working. Wife "Merrily" hand pumped the water and fuel until we found a place where I could borrow a welder and I could make the needed emergency repairs at the small town of Three Rivers. Because I couldn't get any cylinder lubrication to the engine for those 36 desperate miles, we kept the steam pressure down to a low 150 psi in hoping that saturated steam would be our cylinder lubrication. After our roadside welding repair, we had to drive over a hundred miles to get to Bakersfield that night. I just checked out our engine and no damage was done to it. Wet steam worked! Our steam gauge was thrown 50 pounds out of calibration because of the ice in it. The snow covered Sequoia trees were gigantic!
Re: What are your work shop projects being worked on?
Posted by: Rolly (IP Logged)
Date: April 27, 2013 11:56AM
Pat
Are you saying its time we got out of the shop and d-winterized the Stanleys
I just finished a pattern for 20 HP crossheads and brought it over to the foundry to cast some in Navy G SAE 620 CDA 903
Rolly
Are you saying its time we got out of the shop and d-winterized the Stanleys
I just finished a pattern for 20 HP crossheads and brought it over to the foundry to cast some in Navy G SAE 620 CDA 903
Rolly
Attachments: 20 HP Crossheads.JPG (175.3KB)
Re: What are your work shop projects being worked on?
Posted by: SSsssteamer (IP Logged)
Date: April 27, 2013 02:43PM
Rolly... Its time of year to get the water boiling again in our old steamers. The Sequoia National Park would have been a lot more fun later in the year. We have to go back to the big trees in the sunshine some year to see what we missed. At the 3,000 foot level it was posted "tire chains are required" and it was snowing at the time to the 8,000 foot level, but the roads were mostly clear. The Stanley did well on the ice. The next time we will do it in the warmer weather.
Re: What are your work shop projects being worked on?
Posted by: SSsssteamer (IP Logged)
Date: May 08, 2013 04:24AM
I have been working on our 1914 Stanley roadster pump pit. After getting everything squared up again, I installed new hard chrome water pump pistons. Then I had a fit in getting the oil pump to register in the winker again. First the oil pump drive road was 3/8" too short and I had to make a longer drive rod. I then had to get it pumping again. It wouldn't show in the winker. After a lot of fooling around includeing removing the winker glass to see that the lubrication was really getting that far, I finally remembered.... On the Sequoia National Park Tour, I had ran short on 600 W Steam cylinder oil and I had to use some synthetic 140 Wt. gear lube to get me home. When 140 wt is hot, it became thinned out too much to make the winker glass wink. Plus, it wasn't dark enough to see it in the winker anyway. After using my wife's turkey baseter to suck all of the oil out of my oil reservoir, and refilling it with the proper 600 W oil, the winker is now operating again. I am going to have to reset the oil flow to a slower rate as I had fiddled with the adjustment. I turned it only two flats, but that makes a big difference. I put about 20 miles on the roadster this afternoon and I enjoyed every second of it.
Re: What are your work shop projects being worked on?
Posted by: mike clark (IP Logged)
Date: May 10, 2013 07:36PM
I forget stuff too!!
Mike
Mike
Re: What are your work shop projects being worked on?
Posted by: SSsssteamer (IP Logged)
Date: May 27, 2013 01:05AM
I have been working in my shop building a new Baker burner for our 1916 Stanley model 826 Mt. Wagon. The new one piece Baker burner grate is from Alan Kelso and it looks great. I never dreamed that there was so much work in building both a new burner pleneum and a new burner pan. Hopefully our Mt. Wagon will be back onto the road next month. Attached is an original 30 hp burner baffle photo from Alan Kelso. The burner grate baffle was unlike any other burner baffles that I have ever seen. I had to replace my burner pan because it was burned through in too many places to make it worth saving. I made the new burner pan out of 310S stainless steel. 310S was spendy but it will be worth it. The old two piece burner grate had some issues of lighting back through the middle and giving me tube fires. That has been a royal pain for years. The only way to survive from the mixing tube fires was to run a lower fuel pressure and try to keep the mixing tubes turned into the wind. I dropped the burner several times and applied new mud to the affected areas but that was only a temporary fix. We should have a permanent fix now.
Attachments: Burner 30 hp . jpeg.JPG (112.4KB)
Re: What are your work shop projects being worked on?
Posted by: Rolly (IP Logged)
Date: May 27, 2013 10:20AM
Dear Pat
I had one like it in my shop years ago. I believe it to be a standard Baker deflection plate.
I did CAD drawing on the deflection plate, venturi tube assembly and burner pan.
Rolly
I had one like it in my shop years ago. I believe it to be a standard Baker deflection plate.
I did CAD drawing on the deflection plate, venturi tube assembly and burner pan.
Rolly
Attachments: Air tubes.JPG (159.8KB) Burner pan.JPG (149.5KB) Deflection Plate.JPG (110.6KB) Deflection Plate Drg. jpg.jpg (50.9KB)
Re: What are your work shop projects being worked on?
Posted by: SSsssteamer (IP Logged)
Date: May 27, 2013 03:57PM
Dear Rolly, Good information that you have posted above. Thank you. Your deflection plate is about identical to what Alan Kelso makes for his Baker burners. I copied the old style (4 slots) as I had posted in my previous post and also in another photo posted below of an original Baker burner plenum. This last photo also came from Alan Kelso. I try not to re-invent parts for a Stanley as I have found that the early steam car builders have done a way lot more research on designing their parts than I have the time to invest in my re-designing. Our better metals and other materials do however get used in our Stanleys to replace the old inferior materials that were used in their early days.
Attachments: Burner 30 hp.JPG (116.7KB)
Re: What are your work shop projects being worked on?
Posted by: SSsssteamer (IP Logged)
Date: May 31, 2013 04:57AM
My new Baker burner is slowly coming together. Check out the atachment photos. I tried to copy the original Baker burner as best that I could tell by the photos that I had to go by. It should be under our Mt. Wagon and steaming sometime next week. If I could devote a full day to it, it would be running by tomorrow evening. Being retired keeps me busier than when I was working, when I worked 14 hours a day 6 days a week.
Attachments: 30 hp Baker Burner grate in place.jpg (235.3KB) 30 hp Baker grate baffle.jpg (258.4KB) 30 Hp Baker grate gets moldable Fiber Frax.jpg (152.7KB) 30 hp Baker Plenum with mixing tubes.jpg (285.6KB)
Re: What are your work shop projects being worked on?
Posted by: Rolly (IP Logged)
Date: June 04, 2013 11:06PM
I cast up some 20 HP crosshead guides
and have started machining them. Keeping busy
Rolly
and have started machining them. Keeping busy
Rolly
Attachments: crosshead castings.JPG (214KB) Crosshead pattern..jpg (148.6KB) P6030033.JPG (191.1KB)
Re: What are your work shop projects being worked on?
Posted by: SSsssteamer (IP Logged)
Date: June 05, 2013 02:50AM
Rolly, You always do nice work. Thank you for showing us what you are doing.
Re: What are your work shop projects being worked on?
Posted by: SSsssteamer (IP Logged)
Date: June 05, 2013 04:04AM
I finished my 30 hp Baker burner today and I installed it in our Mt. Wagon. Of course I had to drive it to see how it functioned. It worked great! We drove about 15 miles before putting it away for the night. Sorry for the extra small pictures. I over-did the photo down sizing.
Attachments: 30 hp Baker Burner 6.4.13 002.jpg (72.2KB) 30 hp Baker Burner 6.4.13 004.jpg (99.5KB)
Re: What are your work shop projects being worked on?
Posted by: SSsssteamer (IP Logged)
Date: June 26, 2013 01:01AM
Today I machined up a couple of Maxwell pilot lights. One pilot light is for our 1909 model R and the other one is for a spare. I bought the pilot castings from Alan Kelso. My Bridgeport milling machine made the job go real easy. My Coleman Vaporizers were purchased off of eBay for about $30 each. I usually have had real good luck using the Maxwell pilot light in our Stanleys. 1 gallon of Coleman fuel will take about 24 hours of the Maxwell pilot's continuous use to burn it up. The Maxwell pilot operates best at about 10 to 15 PSI fuel pressure.
Re: What are your work shop projects being worked on?
Posted by: SSsssteamer (IP Logged)
Date: June 28, 2013 02:54AM
The two new pilot lights are ready for installation. My two old pilot lights in the background will be kept for spares. While I was at It, I did some updates on the old pilot lights too, like larger peek holes and new vaporizer tubes.
Attachments: Maxwell Pilot lights 002.jpg (47.8KB)
Re: What are your work shop projects being worked on?
Posted by: Rolly (IP Logged)
Date: July 02, 2013 06:25PM
Today I picked up from the foundry the ductile castings for crosshead end of the piston rods for 20 HP Stanley engines.
Rolly
Rolly
Attachments: P7020034s.jpg (209.8KB)
Re: What are your work shop projects being worked on?
Posted by: Rolly (IP Logged)
Date: July 13, 2013 01:11PM
Making progress.
Rolly
Rolly
Attachments: piston rod and crosshead guides -s.jpg (103.2KB)
Re: What are your work shop projects being worked on?
Posted by: Rolly (IP Logged)
Date: October 05, 2013 12:43AM
Today I picked up from the foundry ductile iron castings for 20 HP cylinder heads and pistons.
Looks like I have more shop time.
Rolly
Looks like I have more shop time.
Rolly
Attachments: 20 HP pistons.jpg (217KB) 20 HP Cylinder heads.jpg (229.9KB) 20HP cylinder heads-s.jpg (249.4KB) pistons.- s.jpg (166KB)
Re: What are your work shop projects being worked on?
Posted by: Jeff Brown (IP Logged)
Date: October 05, 2013 11:47PM
So the big question Rolly, what is the 20HP engine going to be used in??
Jeff
Jeff
Re: What are your work shop projects being worked on?
Posted by: Rolly (IP Logged)
Date: October 06, 2013 12:17AM
Good question Jeff
Ive been working on two engines off and on between other projects. They started as a collection of junk. I decided after making a box frame for my 10 HP in my EX to make box frames for 20 HP engine. One thing leads to another and I keep making all new parts.
I guess its just keeping an old man busy.
Always liked the early H ??
By the way I found a photo on E-bay it has your seat on it.
Rolly
Attachments: Box frame engines.JPG (236.2KB) finished brazed-a.jpg (187.3KB) 1909 Stanley.jpg (182.4KB)
Re: What are your work shop projects being worked on?
Posted by: SSsssteamer (IP Logged)
Date: October 06, 2013 02:14AM
The 1909 photo is a 10 hp E2. No parking brake handle immediately gives it away.
Re: What are your work shop projects being worked on?
Posted by: Rolly (IP Logged)
Date: October 06, 2013 10:12AM
You have a good eye Pat.
One reason I had for posting the photo, it dates the seat to 1909 long before the Model 62 of 1911. It was around and available for the Model R.
Of the 100 Rs made, whos to say what seat combinations were used.
Rolly
One reason I had for posting the photo, it dates the seat to 1909 long before the Model 62 of 1911. It was around and available for the Model R.
Of the 100 Rs made, whos to say what seat combinations were used.
Rolly
Re: What are your work shop projects being worked on?
Posted by: Rolly (IP Logged)
Date: October 07, 2013 08:55PM
Three day of machining time and I have two sets of 20 HP cylinder heads.
Rolly
Rolly
Attachments: 20 HP cylinder covers.jpg (168KB)
Re: What are your work shop projects being worked on?
Posted by: Jeff Brown (IP Logged)
Date: October 22, 2013 02:04AM
Finished my headlight brackets this weekend and got them mounted. Still need to find a source of square headed screws to attach them finally. Also finished the frames to mount a steamer trunk on the rear. The trunk is made using original hardware bought off ebay and all the wood is new. I opted for this instead of buying an original trunk as I found the size was quite critical. Currently working on making the fuel level gauge and filler for the pilot tank.
Jeff
Jeff
Attachments: DSCF0571e.jpg (79.3KB) DSCF0572e.jpg (149.1KB)
Re: What are your work shop projects being worked on?
Posted by: SSsssteamer (IP Logged)
Date: October 22, 2013 05:34AM
Jeff, You are doing very nice work. Work that anyone would be proud of.
Re: What are your work shop projects being worked on?
Posted by: SSsssteamer (IP Logged)
Date: October 22, 2013 05:57AM
This summer, on our 1914 Stanley model 606 Roadster, I installed 5/8" diameter hard chromed piston rod stock for the water pump pistons. All these years I have tried all the different possibilities, stainless, bronze, and brass; all with disappointing success. After running the hard chromed piston rods for 6 months now, all I can say is, "Oh my God, what an improvement." The piston rod packing hardly ever needs any taking up on, and the pumps now really do pump more water than I can ever use. Originally my 10 HP Stanley came with 9/16" diameter water pump pistons. Due to all of our mountain climbing out west here, that is why years ago I had increased the pumps' piston rod diameter to 5/8". I like it when everything dealt is a winning hand. :) I purchased the hard chrome piston rod stock out of Dallas, Texas for under $20.
Edited 1 time(s). Last edit at 10/23/2013 03:59PM by SSsssteamer.
Edited 1 time(s). Last edit at 10/23/2013 03:59PM by SSsssteamer.
Re: What are your work shop projects being worked on?
Posted by: Jeff Brown (IP Logged)
Date: October 22, 2013 01:19PM
I'm close to machining all my pump pistons so this is very timely! I always thought hard chrome was just a surface coating - my engine piston rods are done this way. I didn't realize you could buy stock, but what is it like to machine?
Jeff
Jeff
Re: What are your work shop projects being worked on?
Posted by: SSsssteamer (IP Logged)
Date: October 22, 2013 02:38PM
The hard chromed piston rod stock is just as you have known it to be, industrial hard chrome plating over steel and it is ground to perfection. Base material is C-1045-1050. Chrome plating is .0005" thick. You purchase your finished diameter from their on line catalog. Cutting through the hard chrome was clean and easy with my carbide tool bit. You cut it to your needed overall length and finish the ends to your needs. Material for my industrial hard chromed water pump pistons was purchased from: [www.alloysandcomponents.com] They were nice people to work with, and they gave fast delivery too.
Edited 1 time(s). Last edit at 10/22/2013 03:04PM by SSsssteamer.
Edited 1 time(s). Last edit at 10/22/2013 03:04PM by SSsssteamer.
Re: What are your work shop projects being worked on?
Posted by: Jeff Brown (IP Logged)
Date: October 22, 2013 04:31PM
That's great, I'll definitely go with this . Thanks
Re: What are your work shop projects being worked on?
Posted by: Jeff Brown (IP Logged)
Date: October 28, 2013 01:43AM
Spent a pleasant weekend at the lathe turning up parts for the pilot tank. Finished the fuel level gauge - pics attached. The float is from a John Deere fuel gauge - it has a slot in it that turns the spiral strip of stainless which is attached to the pointer . Not quite original but it works quite well. Still need to clean it up and polish it. Filler cap is just about finished also.
Jeff
Jeff
Attachments: DSCF0581e.jpg (111.7KB) DSCF0584e.jpg (123.7KB)
Re: What are your work shop projects being worked on?
Posted by: SSsssteamer (IP Logged)
Date: February 17, 2014 01:46AM
The weather finally warmed up enough that I can now work out in my shop and the wood heater can now keep up with the cold. Today I worked on restoring a potato horn for our 1909 Stanley model R. I have three potato horns and they all look like they were found in a scrap yard. Dents, scrapes and holes in all three of them. I unsoldered all of the parts and I cleand the parts with a fine wire wheel mounted on my drill press. I then anealed the brass by using a propane weed torch by bringing them up to cherry red and then cooling them in a bucket of water. I made a tapered mandrel on my lathe and I then bent it to match the horns' bends. It fit the biggest "U" shaped part like a proper fitting shoe. I found that a rubber hammer took most of the dents out of the parts. It worked like magic. A smaller metal hammer will coax the rest of the small dents to be gone. Tomorrow I will buy some silver solder that is of brass color and I will solder up the cracks and the holes in the parts. Them will come some sanding and pollish work and that will be time consuming. It will be nice to finally have a horn or three that are good enough that I can put one of them onto our model R.
Re: What are your work shop projects being worked on?
Posted by: Peter Turvey (IP Logged)
Date: February 21, 2014 07:48PM
Just finished installing a Steam Enema on Stanley #7644, first attempt at making Stanley flared tube joints, so will steam up again with some trepidation. Could not get as neat a piping layout as I hoped as space was quite tight between firewall and boiler.
Photos of layout here [flic.kr] and [flic.kr]
Photos of layout here [flic.kr] and [flic.kr]
Sorry, only registered users may post in this forum.