1 Steam Cars : Phorum

Attachments: U Bolt -aa.JPG (41.8KB)
Attachments: Model R Spring U bolts 45.7 KB.jpg (44.5KB)
Attachments: P1010033.JPG (82.1KB) PA260002a.JPG (67KB)
Attachments: P1010032.JPG (69.4KB) PA230004.JPG (116KB)
Attachments: P4020024a.jpg (47.6KB) p1010002a.jpg (35KB)
Attachments: P6300001a.jpg (132.2KB) P9050005.JPG (114.1KB)
Attachments: end view.JPG (57.1KB)
Attachments: cross section.jpg (14KB)
Attachments: PC240210_01.jpg (72.1KB)
General Steam Car topics
Any pics of original early U-Bolts?
Posted by: jhl1963 (IP Logged)
Date: October 14, 2008 01:50AM
Wondering if anybody has any pics of original U-Bolts that would be correct for a model R? Are these the same as the Model 70 - when was the change made?
thanks!
thanks!
Re: Any pics of original early U-Bolts?
Posted by: Rolly (IP Logged)
Date: October 14, 2008 11:26AM
Im not sure what model these are from.
Rolly
Rolly
Attachments: U Bolt -aa.JPG (41.8KB)
Re: Any pics of original early U-Bolts?
Posted by: jhl1963 (IP Logged)
Date: October 14, 2008 11:08PM
Thanks Rolly - I've been told that the change was made in late '11/12. Thanks again.
Re: Any pics of original early U-Bolts?
Posted by: SSsssteamer (IP Logged)
Date: October 17, 2008 09:45PM
From our Stanleys, I noticed that the only thing different in their spring U bolts is in their is their size. The different width springs are 1909 model R 1 1/2", 1911 Model 85 1 3/4", 1914 model 606 1 3/8", 1916 model 825 2", and 1922 Model 735B 2". Their lengths also differ because of the number of leaf springs that they have are different from each other. Check out the model R U bolts in the attachment. This photo was taken in Delaware last year.
Attachments: Model R Spring U bolts 45.7 KB.jpg (44.5KB)
Re: Any pics of original early U-Bolts?
Posted by: Rolly (IP Logged)
Date: October 22, 2008 12:54PM
On the earlier cars the crosstie strap on the bottom springs, the sides are tapered and there is a tit to pocket in the spring perch casting.
Rolly
Rolly
Attachments: P1010033.JPG (82.1KB) PA260002a.JPG (67KB)
Re: Any pics of original early U-Bolts?
Posted by: mike clark (IP Logged)
Date: October 22, 2008 01:18PM
Nice job that new U bolt Rolly - did you make it and if so how?
Mike
Mike
Re: Any pics of original early U-Bolts?
Posted by: Rolly (IP Logged)
Date: October 22, 2008 03:40PM
Yes Mike
I made all the U-bolts for my car. I had 5/8 - 4140 water cut to shape, and then used a half round end mill to shape to out side edge. Then I used a universal bit it looks like a hollow end mill to plunge cut the round for the threads.
Rolly
Rolly
I made all the U-bolts for my car. I had 5/8 - 4140 water cut to shape, and then used a half round end mill to shape to out side edge. Then I used a universal bit it looks like a hollow end mill to plunge cut the round for the threads.
Rolly
Rolly
Attachments: P1010032.JPG (69.4KB) PA230004.JPG (116KB)
Re: Any pics of original early U-Bolts?
Posted by: Caleb Ramsby (IP Logged)
Date: October 22, 2008 05:00PM
Hi guys,
This may be a little bit off subject, but does anyone know how many blacksmiths the Stanleys employed in their shop?
That bracket would be a very basic forging job, even by hand.
I find it rather ironic that an old school blacksmith(such as I have been) could make that rather complicated shape very easily, but for someone with more advanced machining skills(like you Rolly, great work by the way!) etc it takes a waterjet, mill and a lot of filing.
I would have started with square stock, rounded and swaged the metal into the half moon shape rounded the ends and then cleaned them up in another swage set and then bend them over the anvil.
For all I know though, those originals could have been forged in a dia with a power hammer or cast from steel.
I just find it ironic that often the modern and advanced approach to making something take longer then an obselete approach.
The King is dead, long live his ghost. . .
Caleb Ramsby
Re: Any pics of original early U-Bolts?
Posted by: Rolly (IP Logged)
Date: October 22, 2008 05:55PM
I would have started with square stock, rounded and swaged the metal into the half moon shape rounded the ends and then cleaned them up in another swage set and then bend them over the anvil.
Caleb Ramsby
That wont work Caleb
Look at the outside edge on the top of the U-bolt there sharp. When you bend ½ round stock into the horse shoe you loose material on the outside edge. They need to look like the original. There must be another way to make the die.
Rolly
Caleb Ramsby
That wont work Caleb
Look at the outside edge on the top of the U-bolt there sharp. When you bend ½ round stock into the horse shoe you loose material on the outside edge. They need to look like the original. There must be another way to make the die.
Rolly
Re: Any pics of original early U-Bolts?
Posted by: Caleb Ramsby (IP Logged)
Date: October 22, 2008 08:24PM
Rolly,
Yes it would, umm. . . one would just need to follow all of the steps that I didn't mention, ooops.
To make a sharp corner(inside and outside) you just have to upset the material at the bend. That is to increase the mass there, or just start off with larger stock and draw the rest of it down to size and shape(the latter often take less time and gives less agravation). Sorry that I didn't get a bit more in depth with my forging description, with blacksmithing it is SO much easier to just imagine what steps are required and then do them at the anvil then describing the proceses to someone, it's real easy to leave out a critical step. Making sharp inside and outside corners on a 90 deg bend is a standard blacksmithing practice, has been for thousands of years, you just can't do it unless you know how.
You would also need to have a block that the finished piece could stradle to be able to forge both inside corners, this is usually a block that sits in the hardie hole or a small stake anvil or a large square bar in the vice or. . . The outside of the corners would be a bit lumpy after the inside was done and could be finished free hand or in an open bottem swage, again no big deal, just takes knowledge and experience.
This was a favorite shape of mine for a while(half or quarter round stock) and I would make handles from it, taking a length of round stock, with one side in a bottem swage I would flatten the other side(I made the swage so that it would make the curved part about 1/4 of a circles segment) and then fold it back on itself, leaving a little hoop at the end to hang it. Then I would give the handle a twist, the line between the metal folded back on itself and a tight or loose twist gave a rather unique look.
I really wish I had a shop now, it would be interesting to see how long it would take to make one of these brackets.
There is another irony here and that is that although there are a lot of hobby and profesional blacksmiths the VAST majority are artist smiths. Making some great looking fire tools, S hooks, gates and fences etc. There are very few smiths that make a living hand forging tools and parts for machines. There might not seem to be a big difference there, but there is. Although all of the same forging principles are used for both realms, I have found that making rather exacting parts for machines is more difficult than making a piece of non functional or just partly functional art.
That is not to say that an artist blacksmith can't make a machine part, it just takes a slightly different aproach to the project and a slightly different skill set. In fact a lot of time making art projects at the forge is spent making tools to manipulate the steel in a certain way.
I hope that this didn't come off the wrong way. No offense meant, just trying to shed a little light.
Caleb Ramsby
Re: Any pics of original early U-Bolts?
Posted by: mike clark (IP Logged)
Date: October 23, 2008 09:15PM
Caleb you are right if you have the skills which I don't!
For my Stanley I compromised, doing without the sharp outer corner. I took round section, milled a flat, made a jig to bend it round hot then made a faceplate fixture for the lathe to present each leg separately for turning and threading.
[i264.photobucket.com]
I needed some more for another project and planned to use exactly the method described by Rolly but at the time couldn't get hold of flat stock to water cut although I now have found some. In the meantime I found a blacksmith!
Mike
Re: Any pics of original early U-Bolts?
Posted by: Caleb Ramsby (IP Logged)
Date: October 23, 2008 10:11PM
Mike,
Nice piece of work! I always say what works, works.
I tell you what, I don't have the skill set to make one the way that Rolly did! I should, but I don't.
I did a lot of welding before getting into blacksmithing and when I did it was like a flood gate opened! I couldn't belive how easy it was to make things at the forge and anvil that would have taken me a whole day with the welder, grinder and hacksaw.
Glad to hear that you found a blacksmith! I would love to know how he or she goes about making the shackel. There are many techniques other than the one that I described to make one at the forge.
I may have been misleading when I said that it was a basic blacksmithing project, making a 90 deg bend with no reduction in section around the bend isn't that hard, doing two bends close together like that is a bit more difficult and then having the outside of the piece curved like it is makes it that much more difficult plus the sharp outside corner.
A open hand held swage to round the outside of the piece as it is sitting on a chunk of metal that it can stradle would probably be the best way to go. It would probably take a few pieces to figure out the size and length of stock required to start off with.
Please keep us posted, it's nice to see some one using a blacksmith for a real purpose, I am sure that they are overjoyed to be working on such an interesting project.
Now the question is, how was the bit that the springs sit on, the axle goes through and the front and rear suspension connecting tube connects to made? That would be a very complex forging and not a very simple casting either.
Food for thought.
Caleb Ramsby
Re: Any pics of original early U-Bolts?
Posted by: Rolly (IP Logged)
Date: October 24, 2008 02:37AM
Now the question is, how was the bit that the springs sit on, the axle goes through and the front and rear suspension connecting tube connects to made? That would be a very complex forging and not a very simple casting either.
Food for thought.
Caleb Ramsby
This is the front end I built for my car. And a photo of the one I copied.
The spring perch is cast ductile 85-55-06 thats 85-T 55-Y the spindles and yokes are A-148 structural steel castings around 110,000 T, 70 to 80Y
Rolly
Rolly
Food for thought.
Caleb Ramsby
This is the front end I built for my car. And a photo of the one I copied.
The spring perch is cast ductile 85-55-06 thats 85-T 55-Y the spindles and yokes are A-148 structural steel castings around 110,000 T, 70 to 80Y
Rolly
Rolly
Attachments: P4020024a.jpg (47.6KB) p1010002a.jpg (35KB)
Re: Any pics of original early U-Bolts?
Posted by: Caleb Ramsby (IP Logged)
Date: October 24, 2008 06:51PM
Rolly,
Thanks for the reply!
Those are some excellent castings that you have there, great job!
It is amazing what quality cast steel one can get now. If I recall correctly Maxim used cast steel for his engine about 100 years ago, for the hollow connecting rods, hollow crank and hollow frame bars. That was a VERY light and powerfull steam engine. I doubt that his steel was as strong and tough as what you used, 110k tensile strength is up there, it also has a great yield to tensile ratio. A bunch of the old steel had about a 1/2 yield to 1 tensile ratio, depending on heat treat.
From all of the parts that you have shown here it seems that you have almost made a whole new Stanley running gear/chassis!
Caleb Ramsby
Re: Any pics of original early U-Bolts?
Posted by: Rolly (IP Logged)
Date: October 24, 2008 07:30PM
From all of the parts that you have shown here it seems that you have almost made a whole new Stanley running gear/chassis!
Caleb Ramsby
I have, the whole Car.
Rolly
Rolly
Caleb Ramsby
I have, the whole Car.
Rolly
Rolly
Attachments: P6300001a.jpg (132.2KB) P9050005.JPG (114.1KB)
Re: Any pics of original early U-Bolts?
Posted by: Caleb Ramsby (IP Logged)
Date: October 24, 2008 07:39PM
Holy dingle berry steamman, that's fantastic!
You are not a Model Works in the making are you?grin
WOW!
What about the boiler and engine?
Caleb Ramsby
You are not a Model Works in the making are you?grin
WOW!
What about the boiler and engine?
Caleb Ramsby
Re: Any pics of original early U-Bolts?
Posted by: Rolly (IP Logged)
Date: October 24, 2008 08:48PM
Caleb thanks for the comments, no I am two old and have no interest it making thing or parts for others as a business. I dont like repetition parts like the U-bolts, there are sixteen needed for a car and they all have to look the same.
There are still a lot of thing I want to build and experiment with. I do make some parts for closes friends but it takes away from my time.
The car is not completed as yet. The body is on and painted. I have not installed the seats and running boards or the fenders; they just get in the way of working on the car and piping it. They are all done and painted.
I have two original engines, I need to go through one and replace all the bearing and make sure its ok, and it runs good now. The boiler is coming along; all thats left is to tube it. The heads are welded on the drum and all heat-treated and stress relived.
I am making the water and fuel tanks at the moment. The water tank is completed except the fill cap. I put it in the car today for a fit. I took some exceptions and added a siphon pipe and overfill drain, the early cars did not have these but from old photos you can tell they were retrofitted.
The fuel tank ends are done and I am using a friends longer break Monday to bend up the copper sheet. I still need to make the fill cap for it as well. My 24-inch brake was just big enough for the water tank.
I still need to make the sheet metal top for the boiler, as well as the pump rod from the engine to the pump assembly.
I have an original burner and pan as well as a new burner casting un-drilled; I will be making a new S.S. pan for the burner. I have two original pilots but both need work.
It should be ready for a run some time next year if I stay healthy.
It looks great with the body on but I want to wait till all the seats and running boards are on before more photos are taken.
Sorry for getting off the subject of this tread.
Rolly
Re: Any pics of original early U-Bolts?
Posted by: Peter Brow (IP Logged)
Date: October 25, 2008 12:32AM
Hi Rolly,
Thanks for getting off topic; interesting stuff! What gauge of copper sheet did you use for your water tank?
The cutter you used for the U-bolt round ends looks like a Hougen Rotabroach bit.
Peter
Thanks for getting off topic; interesting stuff! What gauge of copper sheet did you use for your water tank?
The cutter you used for the U-bolt round ends looks like a Hougen Rotabroach bit.
Peter
Re: Any pics of original early U-Bolts?
Posted by: Rolly (IP Logged)
Date: October 25, 2008 01:13AM
Yes Peter
Hougen is one manufacture of these bits. I just made another tool today using one of these bits. Its used to trim the end of the boiler tube coming through the tube sheet before the finish flaring. I reground the end for a square cut. See attachment
I am using 0.050 stock for the tanks I wanted 0.040 but my supplier did not have it. I used what I could get.
Rolly
Edited 1 time(s). Last edit at 10/25/2008 01:15AM by Rolly.
Attachments: end view.JPG (57.1KB)
Re: Any pics of original early U-Bolts?
Posted by: mdsbob (IP Logged)
Date: October 25, 2008 12:08PM
Rolly,
Very impressive work you are doing. Your attention to detail really separates your work from most of the rest. Are there more pictures that you can post, or do you have a site such as Fotki where more pictures can be seen?
Again, copious kudu's to you on your work.
Regards,
Bob
Very impressive work you are doing. Your attention to detail really separates your work from most of the rest. Are there more pictures that you can post, or do you have a site such as Fotki where more pictures can be seen?
Again, copious kudu's to you on your work.
Regards,
Bob
Re: Any pics of original early U-Bolts?
Posted by: Rolly (IP Logged)
Date: October 25, 2008 01:26PM
Bob I have thousands of photos, and I do have a web site but have not updated it in years. You cant get much done in the shop playing on the computer. I use my computer to do mostly AutoCAD drafting and computations in Excel.
[ourworld-top.cs.com]
Rolly
[ourworld-top.cs.com]
Rolly
Re: Any pics of original early U-Bolts?
Posted by: Peter Brow (IP Logged)
Date: October 27, 2008 11:57PM
Thanks Rolly. With the thicker copper your tank will be stronger. Not sure whether to use copper or steel for my project car's water tank. Steel is lighter, cheaper, stronger, no padded mounting straps, etc.. But copper won't rust thru. I had a steel lawnmower gas tank pinhole thru in about a million places a couple years ago, it was like a sieve. I dried/sanded it and coated the whole outside with epoxy/fiberglass (aircraft cloth), this took less time/effort for me than tracking down a replacement tank. Then again, my water tank is for a condensing car, and there will be straight motor oil inside, which should coat everything except the outside (hopefully).
One idea I thought of was sandblasting a steel tank and tinning it. But using galvanized steel might work just as well. On the fourth hand, a copper tank completely avoids the whole problem. I looked at the commodities tables, and copper is down something like 40% this year. Maybe it boils down to how many steel tanks I'd go thru over the years if I went that way, and how much $/work those would add up to. I do enjoy working with copper ... "traditional" too ...
Peter
Re: Any pics of original early U-Bolts?
Posted by: mdsbob (IP Logged)
Date: December 25, 2008 09:11PM
Rolly,
On making your U-Bolts:
"I had 5/8 - 4140 water cut to shape, and then used a half round end mill to shape to out side edge."
Was the cutter you used a 5/16" radius?
I need to make some, and thinking of replicating the methods that you used. The ones I need to make are for a larger car, thus a different size, and will need to procure the cutters.
Thanks,
Bob
Re: Any pics of original early U-Bolts?
Posted by: Rolly (IP Logged)
Date: December 25, 2008 11:12PM
Bob yes, but if I did them again, they look more original if you mill the depth down further then just half round, the original ones are more flat then half round.
See attachment.
Rolly
See attachment.
Rolly
Attachments: cross section.jpg (14KB)
Re: Any pics of original early U-Bolts?
Posted by: mdsbob (IP Logged)
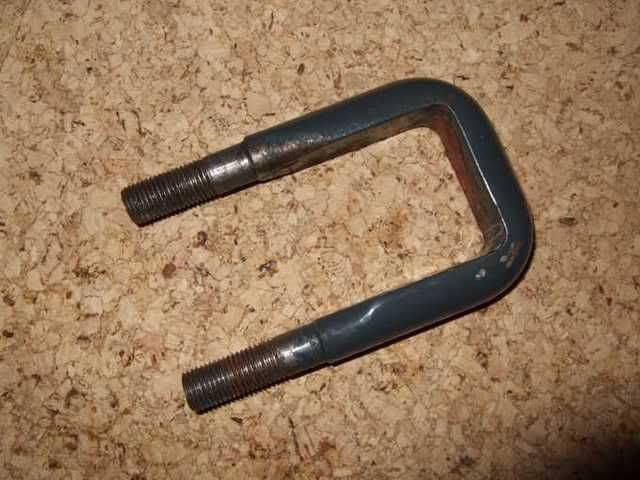
Date: December 26, 2008 03:31AM
Rolly,
Thanks for the reply...You make an interesting point. I only have 1 of the originals, these are from a condensing car and are 7/8" thick.
I am traveling and thus only have this picture to look at (attached) but I had been trying to viualize how I might replicate the "hump" right at the point where it is turned to round about 1/2" below where the threads stop.
After your comment, now I'm thinking that milling to less than half round might be the ticket.
Attachments: PC240210_01.jpg (72.1KB)
Sorry, only registered users may post in this forum.