 |
Warner
Speedo drum renew
by Luke Chaplin
Back to
PageOne
Back to TechPage
|
Subject: Something new
Date: Tue, 18 Jul 2000 08:46:42 -0400 (EDT)
From: luke@patton.com (Luke Chaplin)
To: jw[at]stanleysteamers.com
John,
Here's something new that I whipped up the other night while playing with my
new paint program (Paint Shop Pro). I have a Warner speedometer (white
face) for the second Stanley that I found at Hershey last year. It was in
pretty decent shape except that the paint on the drum was flaking off,
taking the numbers with it. I talked to some speedometer repair guys who
all told me that they did not know anybody who repainted them, that they
just keep looking for a good drum to put in. I found this hard to believe
so came up with my own fix. I took the drum out and held it against the
glass on the moving bed scanner so that it rolled like a wheel and got a
scan of the drum flattened out. I then made a "cleaned up" version right
next to it using the paint program and then deleted the old one. I will
either paste it on the cleaned up drum, or repaint the drum white and then
use thermal transfer paper to put the numbers on the drum. I'll probably
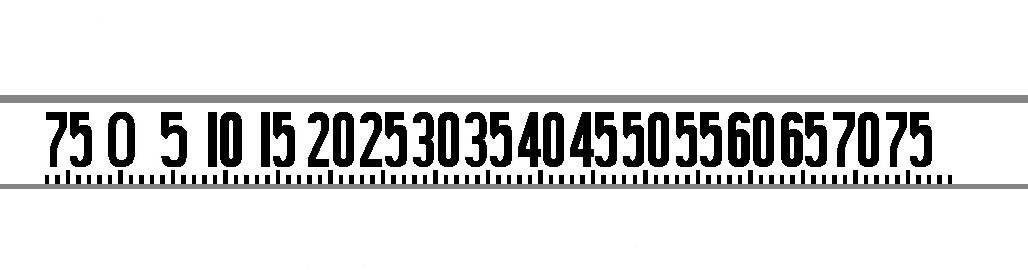
try it this week sometime. Here is the cleaned up image with the
instructions that I plan to use. Unfortuneately, JPEG compression produced
some light "smuginess" around the figures, a really critical person could
clean these away with their own computer, but it probably won't show anyway.
If gluing image directly to drum (one person here suggesting printing it on
vinyl to be more durable, ink may not hold though).
1. Remove paint and clean up old drum.
2. Print image on "A size" paper using a scale factor of 24%. This factor
may need adjusting for different printers (this is the number that worked on
mine). If the scale facator is correct, the number 75 should overlap
exactly when wrapped around the drum.
3. Cut out the image using the light grey bands as guides (Trim away all grey).
4. Trim the ends so that the joint will be between the numbers 70 and 75,
this way it won't show when the speedometer is at rest.
5. Glue it on.
The method that I plan to try:
1. Remove paint and repaint drum flat white.
2. Reverse image and print on "iron on transfer" paper, same 24% scale factor.
3. Cut out the image using the light grey bands as guides (Trim away all grey).
4. Wrap around drum and clamp ends together with hemostat.
5. Apply heat from heat gun and peel away paper.
The second method should give excellent results if the image transfers OK.
I'll let you know soon if it works. Meanwhile here is a copy of the image
for you to look at which you might want to put on the tech section of the
website. Think about it while I'm trying it out. If you do use it, make
sure to point out that it is for the Warner speedometer only.
Also I had a comment from somebody (here at work, they wanted to see what I
did) that they almost overlooked the wiring diagram because they didn't see
it under the steam diagram. Maybe put a link to that on the tech page as well.
Luke
Charles Luke Chaplin, Test Engineer
7622 Rickenbacker Dr.
Gaithersburg, MD 20879
luke@patton.com
Home Fax# : 301-865-1783